
oceanbase数据实时同步到mysql
从 oceanbase实时同步数据到mysql
目录
确定同步架构
要实现数据实时同步,在大数据领域有一个标准流程大致如下:
1.把源数据库的数据结构(表、索引、视图等)迁移到目标库
2.把源数据库现存的数据全量同步到目标库
3.同步全量后产生的增量日志,在目标数据库上回放
4.数据校验
借用OMS官方数据迁移功能的架构图如下:
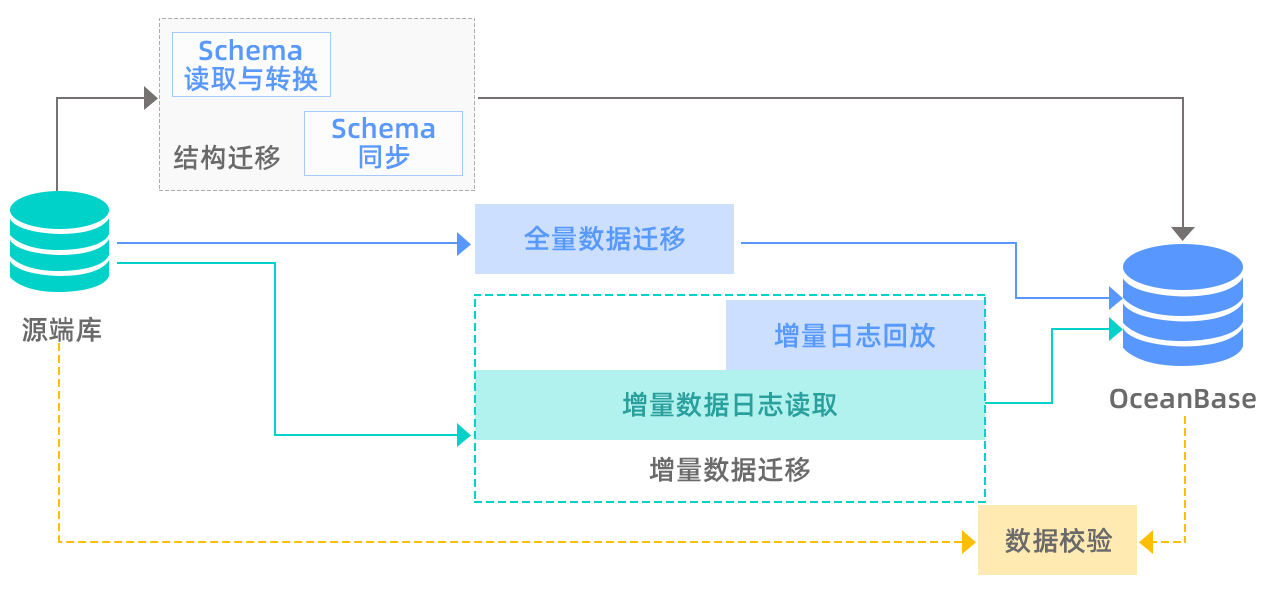
但OMS目前是企业版本的功能,还没有开源,并且当oceanbase做为源端时,只支持增量同步数据到rocketmq\kafka这一个步骤,所以无法使用。
社区版开放了oblogproxy,看介绍属于OMS的一部分,提供实时增量链路接入和管理能力,目前支持的链路接入方式有oblogclient和canal
因此我们4个步骤分别采用以下方案来实现:
1.结构迁移目前没有找到合适的迁移工具,只能手动来做
2.全量同步采用datax
3.增量同步采用oblogproxy+canal
4.数据校验问题很多,开发工作量大,这里暂时不考虑
安装oceanbase
服务器准备
| 服务器 | 操作系统 | 配置 | 目录规划 |
| 172.18.128.73 | CentOS 7.6 内核4.14.187 | 40c128G 万兆网卡 | oceanbase home: /opt/oceanbase oceanbase data: /data/oceanbase/data oceanbase data: /data/oceanbase/redo datax: /opt/datax canal-deployer: /opt/canal-deployer canal-adapter: /opt/canal-adapter |
服务器配置
因为是部署单机版本,所以跳过ssh、时钟源配置
内核参数调整
#关闭透明大页
echo never > /sys/kernel/mm/transparent_hugepage/enabled
#加大内核异步I/O限制
echo 'fs.aio-max-nr=1048576'>>/etc/sysctl.conf
sysctl -p
#关闭selinux
setenforce 0
vi /etc/selinux/config
    SELINUX=disabled
创建操作系统用户
useradd -U oceanbase -d /home/oceanbase -s /bin/bash
mkdir -p /home/oceanbase
sudo chown -R oceanbase:oceanbase /home/oceanbase
#设置密码
passwd oceanbase
#设置sudo权限
echo 'oceanbase       ALL=(ALL)       NOPASSWD: ALL'>>/etc/sudoers
创建data、redo、home目录
mkdir -p /data/oceanbase/data
mkdir -p /data/oceanbase/redo
mkdir /opt/oceanbase
#授权给oceanbase帐号
chown -R oceanbase:oceanbase /data/oceanbase
chown -R oceanbase:oceanbase /opt/oceanbase
安装oceanbase
本次使用OceanBase 部署工具 OBD来安装oceanbase
安装最新版本OBD-1.1.2
wget https://mirrors.aliyun.com/oceanbase/community/stable/el/7/x86_64/ob-deploy-1.1.2-1.el7.x86_64.rpm
yum install -y ob-deploy
下载oceanbase安装包
#下载最新安装包
wget https://mirrors.aliyun.com/oceanbase/community/stable/el/7/x86_64/oceanbase-ce-libs-3.1.1-4.el7.x86_64.rpm
wget https://mirrors.aliyun.com/oceanbase/community/stable/el/7/x86_64/oceanbase-ce-3.1.1-4.el7.x86_64.rpm
wget https://mirrors.aliyun.com/oceanbase/community/stable/el/7/x86_64/obproxy-3.2.0-1.el7.x86_64.rpm
#安装包添加到本地镜像
obd mirror clone oceanbase-ce-libs-3.1.1-4.el7.x86_64.rpm
obd mirror clone oceanbase-ce-3.1.1-4.el7.x86_64.rpm
obd mirror clone obproxy-3.2.0-1.el7.x86_64.rpm
生成配置文件mini-single.conf,主要注意ip、目录、网卡名称、端口
user:
  username: oceanbase  #之前创建的操作系统用户
  password: xxxxxxxxxxx
oceanbase-ce:
  servers:
    - 172.18.128.73
  global:
    home_path: /opt/oceanbase
    data_dir: /data/oceanbase/data
    redo_dir: /data/oceanbase/redo
    devname: bond0
    mysql_port: 2881
    rpc_port: 2882
    zone: zone1
    cluster_id: 1
    memory_limit: 8G
    system_memory: 4G
    stack_size: 512K
    cpu_count: 16
    cache_wash_threshold: 1G
    __min_full_resource_pool_memory: 268435456
    workers_per_cpu_quota: 10
    schema_history_expire_time: 1d
    net_thread_count: 4
    major_freeze_duty_time: Disable
    minor_freeze_times: 10
    enable_separate_sys_clog: 0
    enable_merge_by_turn: FALSE
    datafile_disk_percentage: 20
    syslog_level: INFO
    enable_syslog_wf: false
    enable_syslog_recycle: true
    max_syslog_file_count: 4
使用obd部署集群
[root@clogcap01 opt]$ obd cluster deploy mini-single -c mini-single.conf
oceanbase-ce-3.1.1 already installed.
+-----------------------------------------------------------------------------+
|                                   Packages                                  |
+--------------+---------+---------+------------------------------------------+
| Repository   | Version | Release | Md5                                      |
+--------------+---------+---------+------------------------------------------+
| oceanbase-ce | 3.1.1   | 4.el7   | f19f8bfb67723712175fb0dfd60579196b3168f1 |
+--------------+---------+---------+------------------------------------------+
Repository integrity check ok
Parameter check ok
Open ssh connection ok
Remote oceanbase-ce-3.1.1-f19f8bfb67723712175fb0dfd60579196b3168f1 repository install ok
Remote oceanbase-ce-3.1.1-f19f8bfb67723712175fb0dfd60579196b3168f1 repository lib check ok
Cluster status check ok
Initializes observer work home ok
mini-single deployed
启动集群
[root@clogcap01 opt]$ obd cluster start mini-single
Get local repositories and plugins ok
Open ssh connection ok
Cluster param config check ok
Check before start observer ok
[WARN] (172.18.128.73) The recommended number of open files is 655350 (Current value: 100018)
[WARN] (172.18.128.73) clog and data use the same disk (/data)

Start observer ok
observer program health check ok
Connect to observer ok
Initialize cluster
Cluster bootstrap ok
Wait for observer init ok
+-------------------------------------------------+
|                     observer                    |
+---------------+---------+------+-------+--------+
| ip            | version | port | zone  | status |
+---------------+---------+------+-------+--------+
| 172.18.128.73 | 3.1.1   | 2881 | zone1 | active |
+---------------+---------+------+-------+--------+

mini-single running
安装obclient
wget https://mirrors.aliyun.com/oceanbase/community/stable/el/7/x86_64/libobclient-2.0.0-2.el7.x86_64.rpm
wget https://mirrors.aliyun.com/oceanbase/community/stable/el/7/x86_64/obclient-2.0.0-2.el7.x86_64.rpm
yum install -y libobclient-2.0.0-2.el7.x86_64.rpm
yum install -y obclient-2.0.0-2.el7.x86_64.rpm
连接测试
[root@clogcap01 opt]$ obclient -h 172.18.128.73 -P 2881 -uroot
Welcome to the OceanBase.  Commands end with ; or \g.
Your MySQL connection id is 3221487838
Server version: 5.7.25 OceanBase 3.1.1 (r4-8c615943cbd25a6f7b8bdfd8677a13a21709a05e) (Built Oct 21 2021 10:33:14)

Copyright (c) 2000, 2018, Oracle, MariaDB Corporation Ab and others.

Type 'help;' or '\h' for help. Type '\c' to clear the current input statement.

MySQL [(none)]> select * from oceanbase.__all_server\G
*************************** 1. row ***************************
           gmt_create: 2021-11-19 10:39:19.588072
         gmt_modified: 2021-11-19 10:39:46.068672
               svr_ip: 172.18.128.73
             svr_port: 2882
                   id: 1
                 zone: zone1
           inner_port: 2881
      with_rootserver: 1
               status: active
block_migrate_in_time: 0
        build_version: 3.1.1_4-8c615943cbd25a6f7b8bdfd8677a13a21709a05e(Oct 21 2021 10:33:14)
            stop_time: 0
   start_service_time: 1637289584068327
         first_sessid: 0
       with_partition: 1
    last_offline_time: 0
1 row in set (0.004 sec)
安装oblogproxy
安装
wget http://pub.mirrors.aliyun.com/oceanbase/community/stable/el/7/x86_64/oblogproxy-1.0.0-1.el7.x86_64.rpm
yum install -y oblogproxy-1.0.0-1.el7.x86_64.rpm
配置
#加密sys租户用户名和密码
[root@clogcap01 oblogproxy]$ /usr/local/oblogproxy/bin/logproxy -x root
B13EE2C14A1FBCDCC0ECABFB1DF9A7C7
[root@clogcap01 oblogproxy]$ /usr/local/oblogproxy/bin/logproxy -x 123456
F500DDFCA64C6A4C890EA46E750663F8
#把上面的加密后的密文填入配置文件
[root@clogcap01 oblogproxy]$ cat conf/conf.json
{
  "service_port": 2983,
  "encode_threadpool_size": 8,
  "encode_queue_size": 20000,
  "max_packet_bytes": 8388608,
  "record_queue_size": 1024,
  "read_timeout_us": 2000000,
  "read_fail_interval_us": 1000000,
  "read_wait_num": 20000,
  "send_timeout_us": 2000000,
  "send_fail_interval_us": 1000000,
  "command_timeout_s": 10,
  "log_quota_size_mb": 5120,
  "log_quota_day": 30,
  "log_gc_interval_s": 43200,
  "oblogreader_path_retain_hour": 168,
  "oblogreader_lease_s": 300,
  "oblogreader_path": "./run",
  "allow_all_tenant": true,
  "auth_user": true,
  "auth_use_rs": false,
  "auth_allow_sys_user": true,
  "ob_sys_username": "B13EE2C14A1FBCDCC0ECABFB1DF9A7C7",
  "ob_sys_password": "F500DDFCA64C6A4C890EA46E750663F8",
  "counter_interval_s": 2,
  "metric_interval_s": 120,
  "debug": false,
  "verbose": false,
  "verbose_packet": false,
  "readonly": false,
  "count_record": false,
  "channel_type": "plain",
  "tls_ca_cert_file": "",
  "tls_cert_file": "",
  "tls_key_file": "",
  "tls_verify_peer": true,
  "liboblog_tls": false,
  "liboblog_tls_cert_path": ""
}
启动
[root@clogcap01 oblogproxy]$ bash ./run.sh start
work path : /usr/local/oblogproxy
is_running : (30642)/usr/local/oblogproxy logproxy is running !
logproxy started!
安装DataX
安装canal
由于canal官方版本目前还不支持oceanbase,oceanbase自己维护了一个canal分支。
其中canal-deployer负责从数据源接收增量日志并解析成CanalEntry。
canal-adapter负责消费canal-deployer生成的CanalEntry,写到目标。
安装canal-deployer
为了简化,我们使用tcp模式,生产建议使用MQ模式,Canal先将数据写入kafka或rocketmq,用户可以使用客户端(如canal-adapter)连接kafka或rocketmq进行数据消费
#下载解压
mkdir /opt/canal-deployer
cd /opt/canal-deployer
wget https://github.com/oceanbase/canal/releases/download/canal-for-ob-rc2-bp2/canal.deployer-for-ob-rc2.tar.gz
tar -zxvf canal.deployer-for-ob-rc2.tar.gz
#修改canal server配置文件
vim conf/canal.properties
    canal.serverMode = tcp
    canal.instance.global.spring.xml = classpath:spring/ob-file-instance.xml
安装canal-adapter
#下载解压
mkdir /opt/canal-adapter
cd /opt/canal-adapter
wget https://github.com/oceanbase/canal/releases/download/canal-for-ob-rc2-bp2/canal.adapter-for-ob-rc2.tar.gz
tar -zxvf canal.adapter-for-ob-rc2.tar.gz
执行迁移
表结构同步
在oceanbase和mysql数据库都创建一个表
CREATE TABLE students (
  id int primary key,
  name varchar(100)
)
在oceanbase插入数据
MySQL [test_cdc]> insert into students values(1,'a');
Query OK, 1 row affected (0.004 sec)

MySQL [test_cdc]> insert into students values(2,'b');
Query OK, 1 row affected (0.005 sec)

MySQL [test_cdc]> insert into students values(3,'c');
Query OK, 1 row affected (0.003 sec)

MySQL [test_cdc]> select * from students;
+----+------+
| id | NAME |
+----+------+
|  1 | a    |
|  2 | b    |
|  3 | c    |
+----+------+
3 rows in set (0.001 sec)
全量同步
生成作业文件/opt/datax/job/otm.json
{
    "job": {
        "setting": {
            "speed": {
                "channel":3
            },
            "errorLimit": {
                "record": 0
            }
        },
        "content": [
            {
                "reader": {
                    "name": "oceanbasev10reader",
                    "parameter": {
                        "username": "root",
                        "password": "123456",
                        "column": [
                            "*"
                            ],
                        "weakRead": "false",
                        "readBatchSize": 30,
                        "connection": [
                            {
                                "jdbcUrl": "jdbc:oceanbase://172.18.128.73:2881/test_cdc",
                                "table": [
                                     "students"
                                ]
                            }
                        ]
                    }
                },
                "writer": {
                    "name": "mysqlwriter",
                    "parameter": {
                        "writeMode": "insert",
                        "username": "test_cdc",
                        "password": "7jJBHdfjl",
                        "column": [
                            "*"
                        ],
                        "connection": [
                            {
                                "jdbcUrl": "jdbc:mysql://172.21.10.26:24313/test_cdc",
                               "table": [
                                    "students"
                                ]
                            }
                        ]
                    }
                }
            }
        ]
	}
}
执行迁移python /opt/datax/bin/datax.py /opt/datax/job/otm.json

查看mysql,数据已经实时同步过来

增量同步
启动canal-deployer
修改instance配置文件,vim conf/example/instance.properties。
# ob server info
canal.instance.oceanbase.rsList=172.18.128.73:2882:2881
canal.instance.oceanbase.username=root@sys#mini-single
canal.instance.oceanbase.password=123456
canal.instance.oceanbase.startTimestamp=1637379943000

# ob log proxy info
canal.instance.oceanbase.logproxy.address=172.18.128.73:2983
canal.instance.oceanbase.logproxy.sslEnabled=false
canal.instance.oceanbase.logproxy.serverCert=../conf/${canal.instance.destination:}/ca.crt
canal.instance.oceanbase.logproxy.clientCert=../conf/${canal.instance.destination:}/client.crt
canal.instance.oceanbase.logproxy.clientKey=../conf/${canal.instance.destination:}/client.key

# tenant name
canal.instance.oceanbase.tenant=sys
# exclude tenant name in target schema name
canal.instance.parser.excludeTenantInDbName=true

# table regex, format: [tenant].[database].[table]
#同步sys租户下test_cdc数据库下的所有表
canal.instance.filter.regex=sys.test_cdc.*

# mq config
#canal.mq.topic=example
# dynamic topic route by schema or table regex
#canal.mq.dynamicTopic=mytest1.user,mytest2\\..*,.*\\..*
#canal.mq.partition=0
运行bin/startup.sh启动canal-deployer,查看/opt/canal/logs/example/example.log启动成功
2021-11-20 12:00:16.121 [main] INFO  c.a.otter.canal.instance.spring.CanalInstanceWithSpring - start CannalInstance for 1-example
2021-11-20 12:00:16.134 [main] WARN  c.alibaba.otter.canal.parse.inbound.AbstractBinlogParser - --> init table filter : ^sys.test_cdc.*$
2021-11-20 12:00:16.135 [main] WARN  c.alibaba.otter.canal.parse.inbound.AbstractBinlogParser - --> init table black filter :
2021-11-20 12:00:16.218 [main] INFO  c.a.otter.canal.instance.core.AbstractCanalInstance - start successful....
2021-11-20 12:00:16.218 [destination = example , address = /172.18.128.73:2983 , EventParser] INFO  c.a.o.c.p.inbound.oceanbase.logproxy.
LogProxyEventParser - Build connection with config rootserver_list=172.18.128.73:2882:2881, cluster_user=root@sys#mini-single, cluster_pa
ssword=******, tb_white_list=sys.test_cdc.*, start_timestamp=1637379943000
2021-11-20 12:00:16.275 [Thread-5] WARN  com.oceanbase.clogproxy.client.connection.ClientStream - start to reconnect...
2021-11-20 12:00:16.438 [Thread-5] WARN  com.oceanbase.clogproxy.client.connection.ClientStream - reconnect SUCC
启动canal-adapter
修改配置文件vim conf/application.yml
server:
  port: 8081
spring:
  jackson:
    date-format: yyyy-MM-dd HH:mm:ss
    time-zone: GMT+8
    default-property-inclusion: non_null

canal.conf:
  mode: tcp #tcp kafka rocketMQ rabbitMQ
  flatMessage: true
  zookeeperHosts:
  syncBatchSize: 1000
  retries: 0
  timeout:
  accessKey:
  secretKey:
  consumerProperties:
    # canal tcp consumer
    canal.tcp.server.host: 172.18.128.73:11111
    canal.tcp.zookeeper.hosts:
    canal.tcp.batch.size: 500
    canal.tcp.username:
    canal.tcp.password:

  canalAdapters:
  - instance: example # canal instance Name or mq topic name
    groups:
    - groupId: g1
      outerAdapters:
      - name: logger
      - name: rdb
        key: mysql1
        properties:
          jdbc.driverClassName: com.mysql.jdbc.Driver
          jdbc.url: jdbc:mysql://xxx.xxx.xxx.xxx:xxxx/test_cdc?useUnicode=true
          jdbc.username: test_cdc
          jdbc.password: 7jJBHdfjl
配置为整库同步vim conf/rdb/mytest_user.yml
dataSourceKey: defaultDS
destination: example
groupId: g1
outerAdapterKey: mysql1
concurrent: true
dbMapping:
  mirrorDb: true
  database: test_cdc
启动bin/startup.sh
验证
在ob插入数据
MySQL [test_cdc]> insert into students values(5,'d');
Query OK, 1 row affected (0.007 sec)

MySQL [test_cdc]> begin;
Query OK, 0 rows affected (0.001 sec)

MySQL [test_cdc]> insert into students values(6,'d');
Query OK, 1 row affected (0.001 sec)

MySQL [test_cdc]> insert into students values(7,'d');
Query OK, 1 row affected (0.001 sec)

MySQL [test_cdc]> commit;
Query OK, 0 rows affected (0.002 sec)
查看canal-adapter日志
2021-11-20 12:09:42.507 [pool-7-thread-1] INFO  c.a.o.canal.client.adapter.logger.LoggerAdapterExample - DML: {"data":[{"id":5,"NAME":"d"
}],"database":"test_cdc","destination":"example","es":1637381381,"groupId":"g1","isDdl":false,"old":null,"pkNames":["id"],"sql":"","table
":"students","ts":1637381382419,"type":"INSERT"}
2021-11-20 12:10:09.636 [pool-7-thread-1] INFO  c.a.o.canal.client.adapter.logger.LoggerAdapterExample - DML: {"data":[{"id":6,"NAME":"d"
}],"database":"test_cdc","destination":"example","es":1637381408,"groupId":"g1","isDdl":false,"old":null,"pkNames":["id"],"sql":"","table
":"students","ts":1637381409636,"type":"INSERT"}
2021-11-20 12:10:09.637 [pool-7-thread-1] INFO  c.a.o.canal.client.adapter.logger.LoggerAdapterExample - DML: {"data":[{"id":7,"NAME":"d"
}],"database":"test_cdc","destination":"example","es":1637381408,"groupId":"g1","isDdl":false,"old":null,"pkNames":["id"],"sql":"","table
":"students","ts":1637381409636,"type":"INSERT"}
查询mysql,数据已经同步过来

遗留问题
在oceanbase上执行ddl变更表结构(如添加字段),canal-adapter会报错,看日志是没有正确解析出表名,后面再看看有没有解决方案

参考文档
oceanbase安装:OceanBase 社区版
oblogproxy:GitHub - oceanbase/oblogproxy: A proxy service of incremental log of OceanBase
canal-ob:GitHub - oceanbase/canal: 阿里巴巴 MySQL binlog 增量订阅&消费组件

了解最新的技术洞察和前沿趋势,参与 OceanBase 定期举办的线下活动,与行业开发者互动交流
更多推荐


 1
1 0
0- 0


 已为社区贡献1条内容

所有评论(0)